

本文重点讲述如何将 Hugo 生成的静态网站部署到 Github Pages。内容建设参考:
使用 Hugo 搭建个人博客
本文基于 Hugo 框架与 Blowfish 主题,详细记录了个人博客从环境配置到内容创作的完整流程与实用技巧。
1 创建公开仓库 #
创建公开仓库 fairchild26.github.io
获得 Git 教程:
# …or create a new repository on the command line
echo "# fairchild26.github.io" >> README.md
git init
git add README.md
git commit -m "first commit"
git branch -M main
git remote add origin git@github.com:fairchild26/fairchild26.github.io.git
git push -u origin main

# …or push an existing repository from the command line
git remote add origin git@github.com:fairchild26/fairchild26.github.io.git
git branch -M main
git push -u origin main
2 生成站点内容 #
hugo
cd public
git init
git remote add origin git@github.com:fairchild26/fairchild26.github.io.git
git add .
git commit -m "first commit"
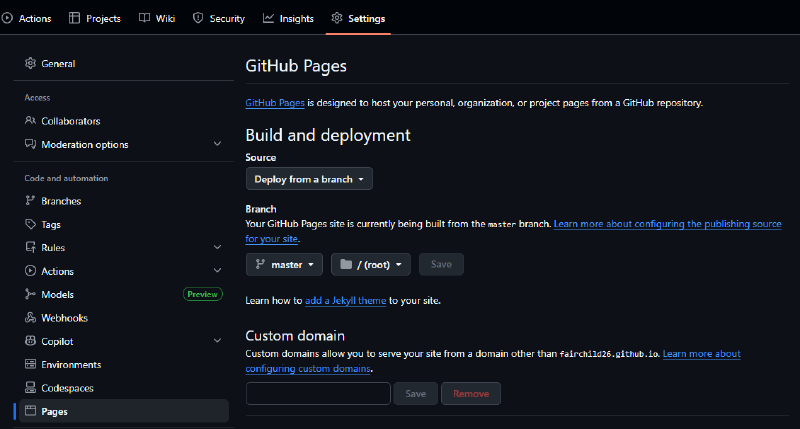
git push -u origin master在 Github Pages 页面选择 Source Deploy from a branch, Branch master /(root)
3 搭建 Linux 环境 #
一般地,使用 hugo 命令生成的站点内容 public/ 可以直接用于发表,但笔者发现,将在 Windows cmd.exe 下生成的内容提交到仓库,得到的网页没有任何格式可言,文字段落和图片等资源全部按行展示,没有左右、缺乏渲染。
参考讨论,决定在 linux 环境中生成内容。
3.1 Git 用户身份设置 #
# 设置全局邮箱 和 全局用户名
git config --global user.email "your_email@example.com"
git config --global user.name "Your Name"

# 验证配置是否生效
git config --global --get user.email
git config --global --get user.name
3.2 Github SSH 密钥 #
# 生成 SSH 密钥
ssh-keygen -t ed25519 -C "your_email@example.com"

# 正确回应每个提示
# Enter file in which to save the key (/home/xt/.ssh/id_ed25519):
[Enter] # 直接回车,使用默认保存路径

# Enter passphrase (empty for no passphrase):
[Enter] # 直接回车,不设置密码短语

# Enter same passphrase again:
[Enter] # 直接回车
秘钥成功生成的标志
Your identification has been saved in /home/xt/.ssh/id_ed25519
Your public key has been saved in /home/xt/.ssh/id_ed25519.pub
The key fingerprint is:
SHA256:xxxxxxxxxxxxxxxxxxxxxxxxxxxxxxxxxxxxxxxxxxx your_email@example.com
The key's randomart image is:
+--[ED25519 256]--+
|    .o.          |
|   .  . .        |
|    .  . .       |
|   . . . .       |
|    + . S        |
|   + + .         |
|  . = o .        |
|   +.Eo .        |
|  .o+++.         |
+----[SHA256]-----+
查看并复制公钥,
cat ~/.ssh/id_ed25519.pub访问 GitHub → Settings → SSH and GPG keys → New SSH key
Title: 我的 Linux 电脑
Key type: Authentication Key
Key: ssh-ed25519 AAAA...Q8XW your_email@example.com
点击 “Add SSH key”
3.3 Go 和 Hugo 安装 #
# 安装 Go
sudo apt install gccgo-go
# 配置环境
export PATH=$PATH:/usr/local/go/bin
go version
使用 sudo apt install hugo 命令安装的 Hugo 可能版本较低,推荐下载二进制文件。安装之前卸载旧版。
# 访问 https://github.com/gohugoio/hugo/releases
# Linux amd64 系统 extended 版本
wget https://github.com/gohugoio/hugo/releases/download/v0.146.7/hugo_extended_0.146.7_linux-amd64.tar.gz

# 安装解压工具
sudo apt install tar gzip

# 分步解压
gunzip hugo_extended_0.146.7_linux-amd64.tar.gz
tar -xvf hugo_extended_0.146.7_linux-amd64.tar

# 用 sudo 权限将 hugo 移动到 /usr/local/bin/
sudo mv hugo /usr/local/bin/

# 验证移动成功
ls -l /usr/local/bin/hugo

# 确保 hugo 有执行权限
sudo chmod +x /usr/local/bin/hugo

# 检查版本
hugo version

# 刷新
hash -r

hugo version
暂不考虑 Dart Sass 的安装。
4 浏览更多教程 #
做完准备工作,以后每次提交只用这几个命令:
# 把远程的更新拉下来
cd public
git pull --no-rebase origin master
cd ..

# 把本地的更新推上去
hugo
cd public
git add .
git commit -m "second commit"
git push -u origin master
用 Github 的 gh-pages 分支展示自己的项目,及 Github Action 自动发布,可参考
https://jianzhnie.github.io/post/hugo_site/
https://blowfish.page/zh-cn/docs/hosting-deployment/